
It's always fun to write about research that you can actually try out for yourself.
Try this: Take a photo and upload it to Facebook, then after a day or so, note what the URL to the picture is (the actual photo, not the page on which the photo resides), and then delete it. Come back a month later and see if the link works. Chances are: It will.
Facebook isn't alone here. Researchers at Cambridge University (so you know this is legit, people!) have found that nearly half of the social networking sites don't immediately delete pictures when a user requests they be removed. In general, photo-centric websites like Flickr were found to be better at quickly removing deleted photos upon request.
Why do "deleted" photos stick around so long? The problem relates to the way data is stored on large websites: While your personal computer only keeps one copy of a file, large-scale services like Facebook rely on what are called content delivery networks to manage data and distribution. It's a complex system wherein data is copied to multiple intermediate devices, usually to speed up access to files when millions of people are trying to access the service simultaneously. (Yahoo! Tech is served by dozens of servers, for example.) But because changes aren't reflected across the CDN immediately, ghost copies of files tend to linger for days or weeks.
In the case of Facebook, the company says data may hang around until the URL in question is reused, which is usually "after a short period of time." Though obviously that time can vary considerably.
Of course, once a photo escapes from the walled garden of a social network like Facebook, the chances of deleting it permanently fall even further. Google's caching system is remarkably efficient at archiving copies of web content, long after it's removed from the web. Anyone who's ever used Google Image Search can likely tell you a story about clicking on a thumbnail image, only to find that the image has been deleted from the website in question -- yet the thumbnail remains on Google for months. And then there are services like the Wayback Machine, which copy entire websites for posterity, archiving data and pictures forever.
The lesson: Those drunken party photos you don't want people to see? Simply don't upload them to the web, ever, because trying to delete them after you sober up is a tough proposition.
Thursday, May 28, 2009
Photoshop: Advertising Banner Design For website
In this tutorial I’ll teach you how to make a nice, sleek and professional advertisement banner. It’s really quite easy, but you will need previous Photoshop knowledge to successfully complete this tutorial.

Step 1:
First step is to make the document in Photoshop. File > New, use a size of 468 x 60 pixels.
Now fill the background with a nice orange gradient, the colors I used for my gradient were #e14d0f and #4d1805.
 Note that you’ll need to use the Gradient Tool to fill the background with the gradient. You can find the gradient tool on the same button as the fill bucket tool.
Step 2:
Next thing to do is create a new layer. Now using the Polygonal Lasso Tool, make a selection like mine in the left section of your document.
 Be sure you’re on a new layer, then fill your selection with a nice, bright gradient, the colors for the gradient I used were #0084e6 and #003967.
 Right-click your layer and go into the Blending Options, apply the following layer styles for your blue gradient layer:
 After you applied those two layer styles, your thing should now look like this:
 Lastly for this step, add a nice glossy highlight to your blue gradient layer, you can do this by following these few simple steps:
1. Start by making a new layer, now select the blue gradient layer by holding ctrl and clicking the layer’s thumbnail.
2. Using the Gradient Tool, drag a white gradient inside of your selection.
3. After making your gradient, nudge your selection down 30 pixels (hold shift and press the down arrow key three times) then press delete.
4. Change the layer mode for your shine layer to Soft Light, and lower the opacity to about 30-55%.
 Step 3:
How about adding some nice details?
Start by using the pen tool to make a nice, smooth path in the background on the right. After you made a nice selection, do a little soft brushing inside then change the layer mode to Soft Light and lower the opacity if needed.

 Step 4:
Write out your description text in the left section using the Horizontal Type Tool, write your text out in white (#FFFFFF.)

The font used above is called RockWell, you can find it for free on DaFont.
After writing out your text, apply the following layer styles:

 That will have made your text stand out a bit more nicely.
 Step 5:
Next thing to do is add in some thumbnails or something else on the right side, or you could use some descriptive text. I added in 3 thumbnails from tutorials from PhotoshopSpot, then applied this Inner Glow and this Stroke.
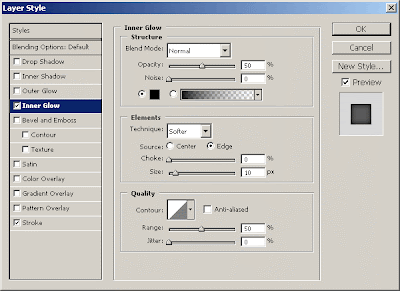
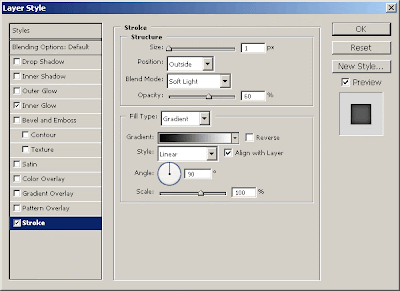 You should have something like this:
 Step 6:
Lastly you’ll want to add in something that will attract the users’ eye, so I added in a little star badge with the text: “GO!”
 Firstly I made the star badge by using the Polygon Tool, then I added in the following layer styles:
 And you should have a badge that looks like this:
 Lastly I added in the text for the badge, I then applied the following layer styles:
 And now you should have text that looks like this:
 Step 7:
Last thing you will want to do is add in the border, I guess it depends what sort of website it will be going on to choose the color. If it’s going on a black website, you should use white as the border, if it’s going on a white website, you should use a black border.

Step 1:
First step is to make the document in Photoshop. File > New, use a size of 468 x 60 pixels.
Now fill the background with a nice orange gradient, the colors I used for my gradient were #e14d0f and #4d1805.
 Note that you’ll need to use the Gradient Tool to fill the background with the gradient. You can find the gradient tool on the same button as the fill bucket tool.
Step 2:
Next thing to do is create a new layer. Now using the Polygonal Lasso Tool, make a selection like mine in the left section of your document.
 Be sure you’re on a new layer, then fill your selection with a nice, bright gradient, the colors for the gradient I used were #0084e6 and #003967.
 Right-click your layer and go into the Blending Options, apply the following layer styles for your blue gradient layer:
 After you applied those two layer styles, your thing should now look like this:
 Lastly for this step, add a nice glossy highlight to your blue gradient layer, you can do this by following these few simple steps:
1. Start by making a new layer, now select the blue gradient layer by holding ctrl and clicking the layer’s thumbnail.
2. Using the Gradient Tool, drag a white gradient inside of your selection.
3. After making your gradient, nudge your selection down 30 pixels (hold shift and press the down arrow key three times) then press delete.
4. Change the layer mode for your shine layer to Soft Light, and lower the opacity to about 30-55%.
 Step 3:
How about adding some nice details?
Start by using the pen tool to make a nice, smooth path in the background on the right. After you made a nice selection, do a little soft brushing inside then change the layer mode to Soft Light and lower the opacity if needed.

 Step 4:
Write out your description text in the left section using the Horizontal Type Tool, write your text out in white (#FFFFFF.)

The font used above is called RockWell, you can find it for free on DaFont.
After writing out your text, apply the following layer styles:

 That will have made your text stand out a bit more nicely.
 Step 5:
Next thing to do is add in some thumbnails or something else on the right side, or you could use some descriptive text. I added in 3 thumbnails from tutorials from PhotoshopSpot, then applied this Inner Glow and this Stroke.

 You should have something like this:
 Step 6:
Lastly you’ll want to add in something that will attract the users’ eye, so I added in a little star badge with the text: “GO!”
 Firstly I made the star badge by using the Polygon Tool, then I added in the following layer styles:

 And you should have a badge that looks like this:
 Lastly I added in the text for the badge, I then applied the following layer styles:
 And now you should have text that looks like this:
 Step 7:
Last thing you will want to do is add in the border, I guess it depends what sort of website it will be going on to choose the color. If it’s going on a black website, you should use white as the border, if it’s going on a white website, you should use a black border.
Friday, May 22, 2009
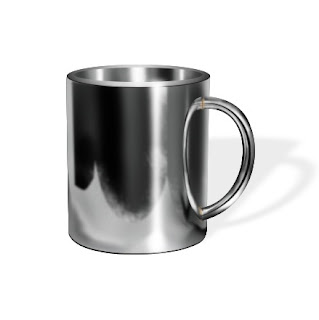
Photoshop:Learn Logo Design Steel Cup Effect
Today I am telling you about How to Create Photoshop Steel Cup Logo Icon. Please follow the steps mentioned below.
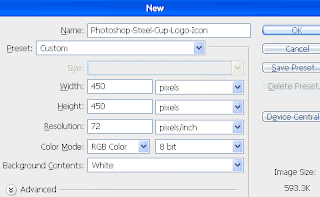
1-First of all Open New Document of Custom Size,Height & Width 450×450 pixels,Resolution 72 & Mode RGB Color
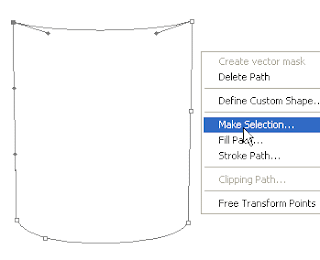
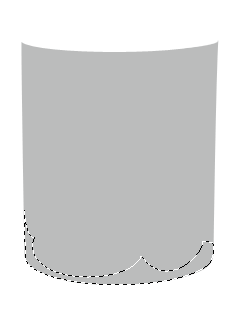
2-Now Open New Layer & then create the following shape with the help of ‘Pen Tool’ right
click select ‘Make Selection’
3-In Make Selection ‘Feather Radius’ should 0 pixels,Tick on New Selection & then ok & your
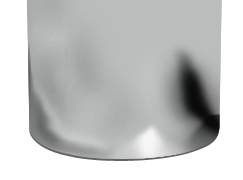
image should look like as shown below
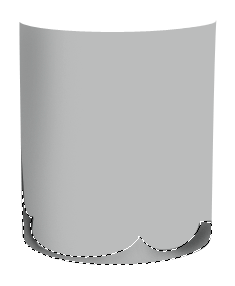
 4-Now fill the selection with ‘bbbcbc’ color & then create the following selection with the
help of ‘Pen Tool’
 5-Now select ‘Burn Tool’ & create the following shading
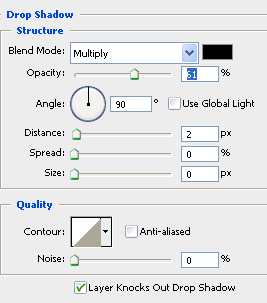
 6-Now select ‘Dodge Tool’ & Highlight the some parts & after that press Ctrl+Shift+I &
create the some shading
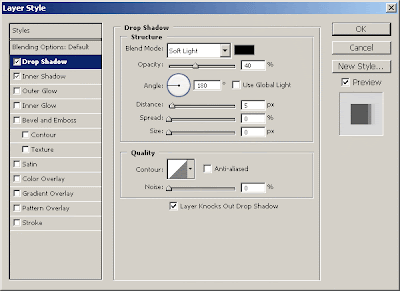
 7-Now go to Blending Options,select Drop Shadow & use the following settings
Photoshop Technique-How to use the Drop Shadow feature
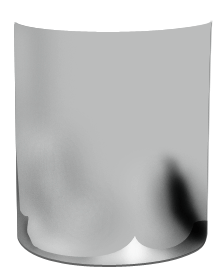
 8-Now your image should look like as shown below
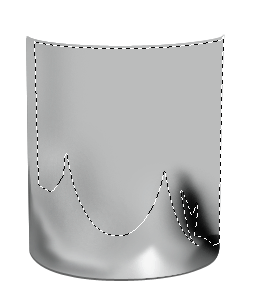
 9-Now select ‘Smudge Tool’ & create the following shading
 10-Now Open New Layer & then create the following selection with the help of ‘Pen Tool’
 11-Now fill the selection with same color & create the following shading with the help of
‘Burn Tool’
 12-Now select “Dodge Tool” & use the following settings
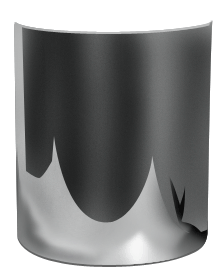
 13-Now Highlight the some parts with the help of ‘Dodge Tool’ & your image should look like
as shown below
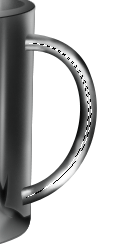
 14-Now create the following shape with the help of ‘Pen Tool’ right click select ‘Stroke Path’
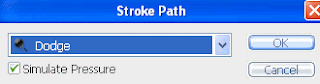
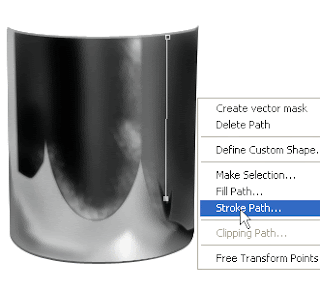 15-Now use the following settings in Stroke Path
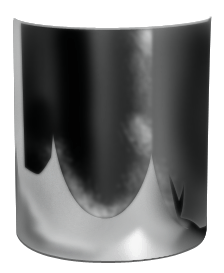
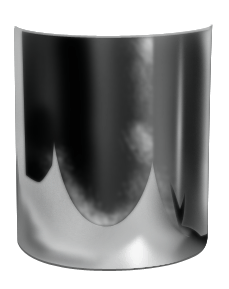
 16-Now like this Highlight the other parts & your image should look like as shown below
 17-Now Open New Layer & then create the following selection with the help of ‘Elliptical
Marquee Tool’
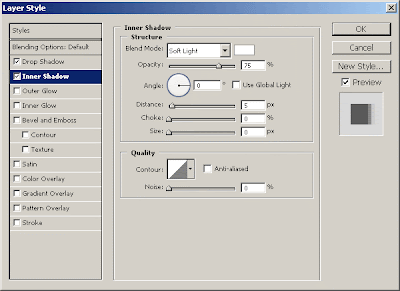
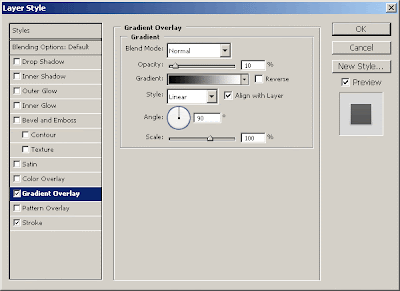
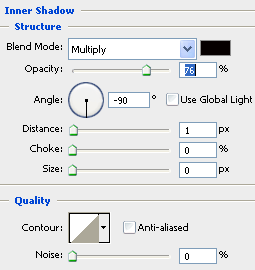
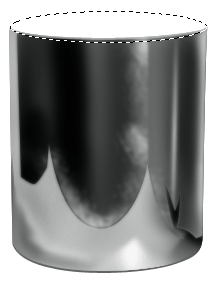 18-Now fill the selection with any color & then go to Blending Options,select Inner Shadow
& use the following settings Photoshop Technique-How to use the Inner Shadow feature
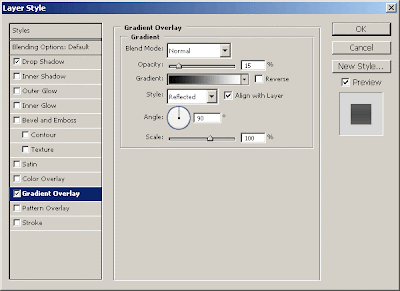
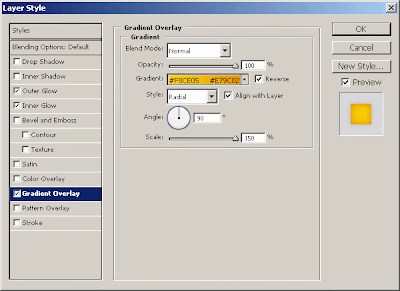
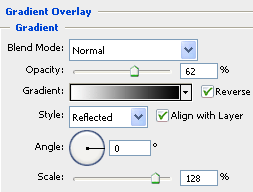
 19-Now select Gradient Overlay & use the following settings
Photoshop Technique-How to use the Gradient Overlay feature
 20-Now Open New Layer & then create the following selection with the help of ‘Elliptical
Marquee Tool’
 21-Now fill the selection with same color & create the following shading with the help of
‘Burn & Dodge Tool’ & after that create the following selection with the help of ‘Pen Tool’
 22-Now Open New Layer & then fill the selection with same color & create the following
shading with the help of ‘Burn & Dodge Tool’
 23-Now create the following selection with the help of ‘Pen Tool’ & then fill with ‘000000′ color
 24-Now Make the Duplicate Layer with the help of Ctrl+J & then press Ctrl+T,right click
select ‘Flip Horizontal’ & then press ENTER
 25-Now Open New Layer & then create the following selection with the help of ‘Pen Tool’
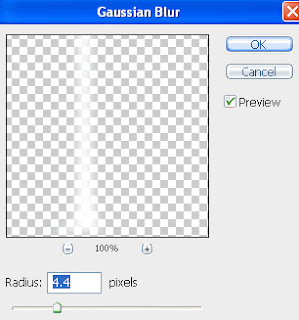
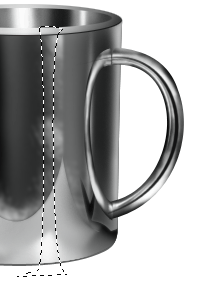 26-Now fill the selection with ‘fffffa’ color & then go to Filter>Blur>Gaussian Blur & use
the following settings
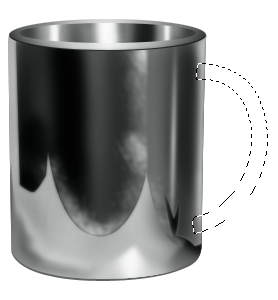
27-Now your image should look like as shown below
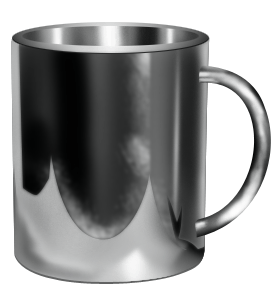
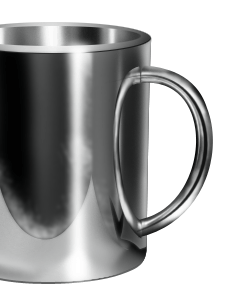 28-Thanks for read this Photoshop Tutorial.I hope this is a good tutorial & u can use these
Photoshop Techniques in your Graphics Design Project
1-First of all Open New Document of Custom Size,Height & Width 450×450 pixels,Resolution 72 & Mode RGB Color

2-Now Open New Layer & then create the following shape with the help of ‘Pen Tool’ right
click select ‘Make Selection’

3-In Make Selection ‘Feather Radius’ should 0 pixels,Tick on New Selection & then ok & your
image should look like as shown below
 4-Now fill the selection with ‘bbbcbc’ color & then create the following selection with the
help of ‘Pen Tool’
 5-Now select ‘Burn Tool’ & create the following shading
 6-Now select ‘Dodge Tool’ & Highlight the some parts & after that press Ctrl+Shift+I &
create the some shading
 7-Now go to Blending Options,select Drop Shadow & use the following settings
Photoshop Technique-How to use the Drop Shadow feature
 8-Now your image should look like as shown below
 9-Now select ‘Smudge Tool’ & create the following shading
 10-Now Open New Layer & then create the following selection with the help of ‘Pen Tool’
 11-Now fill the selection with same color & create the following shading with the help of
‘Burn Tool’
 12-Now select “Dodge Tool” & use the following settings
 13-Now Highlight the some parts with the help of ‘Dodge Tool’ & your image should look like
as shown below
 14-Now create the following shape with the help of ‘Pen Tool’ right click select ‘Stroke Path’
 15-Now use the following settings in Stroke Path
 16-Now like this Highlight the other parts & your image should look like as shown below
 17-Now Open New Layer & then create the following selection with the help of ‘Elliptical
Marquee Tool’
 18-Now fill the selection with any color & then go to Blending Options,select Inner Shadow
& use the following settings Photoshop Technique-How to use the Inner Shadow feature
 19-Now select Gradient Overlay & use the following settings
Photoshop Technique-How to use the Gradient Overlay feature

 20-Now Open New Layer & then create the following selection with the help of ‘Elliptical
Marquee Tool’
 21-Now fill the selection with same color & create the following shading with the help of
‘Burn & Dodge Tool’ & after that create the following selection with the help of ‘Pen Tool’
 22-Now Open New Layer & then fill the selection with same color & create the following
shading with the help of ‘Burn & Dodge Tool’
 23-Now create the following selection with the help of ‘Pen Tool’ & then fill with ‘000000′ color
 24-Now Make the Duplicate Layer with the help of Ctrl+J & then press Ctrl+T,right click
select ‘Flip Horizontal’ & then press ENTER
 25-Now Open New Layer & then create the following selection with the help of ‘Pen Tool’
 26-Now fill the selection with ‘fffffa’ color & then go to Filter>Blur>Gaussian Blur & use
the following settings

27-Now your image should look like as shown below
 28-Thanks for read this Photoshop Tutorial.I hope this is a good tutorial & u can use these
Photoshop Techniques in your Graphics Design Project

Subscribe to:
Posts (Atom)